Why would you need to do this?
Good question! I have a small amount compulsive behaviour when it comes to labels that are associated with GitHub projects that I work on. Both in terms of the colour that is used, as well as the text that is associated with the label. Being consistent means that it is much easier to identity what an issue/pull request is about, before even reading anything about it.
So what is the problem?
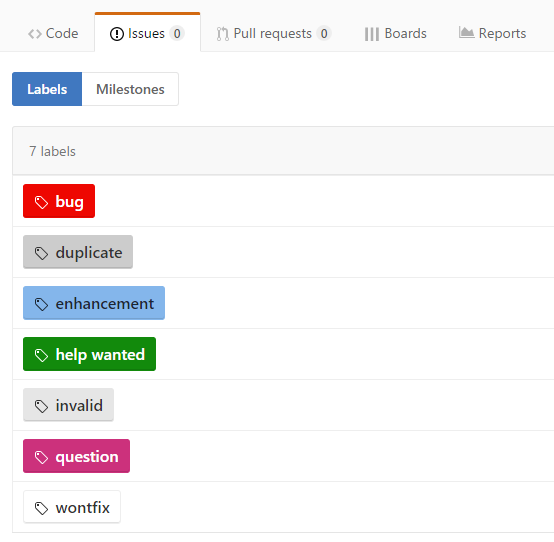
By default, when you create a new repository on GitHub, this is what you get for labels:
Now, while some of you might be saying there is nothing wrong with this, I much prefer them to look like this:
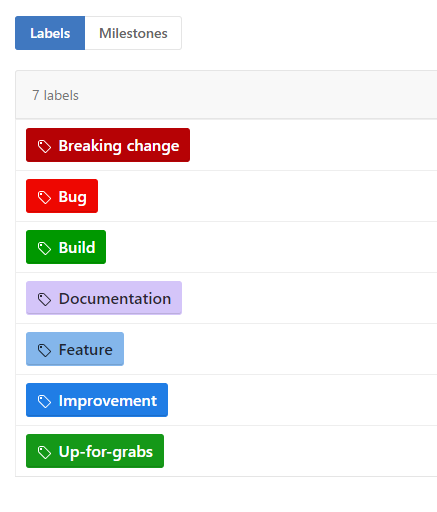
Ah, much better!
Now, while I could make these changes manually through the GitHub User Interface, this is time consuming, and prone to mistakes. Having done this more than two times, it was time to automate it!
Enter Octokit
Octokit is GitHub API Client, which means that you can do pretty much anything through it, that you can do through the GitHub User Interface, including the creation of labels.
After a small amount of hacking, this is what I came up with (NOTE: I wouldn't really consider this production ready code, but it does serve my purpose).
Run the Program
private static GitHubClient _githubClient;

static void Main(string[] args)
{
    _githubClient = CreateGitHubClient();

    GetLabels();
}
Create the GitHub Client
NOTE: This part requires you to input either the password or access token that you use for GitHub. The ProductHeaderValue can really be anything.
private static GitHubClient CreateGitHubClient()
{
    var credentials = new Credentials("gep13", "<your access token needs to go here>");
    var github = new GitHubClient(new ProductHeaderValue("gep13")) { Credentials = credentials };
    return github;
}
Setup Default Labels
private static List<NewLabel> _defaultLabels = new List<NewLabel>();

private static void SetUpDefaultLabels()
{
    _defaultLabels.Add(new NewLabel("Breaking change", "b60205"));
    _defaultLabels.Add(new NewLabel("Bug", "ee0701"));
    _defaultLabels.Add(new NewLabel("Build", "009800"));
    _defaultLabels.Add(new NewLabel("Documentation", "d4c5f9"));
    _defaultLabels.Add(new NewLabel("Feature", "84b6eb"));
    _defaultLabels.Add(new NewLabel("Improvement", "207de5"));
    _defaultLabels.Add(new NewLabel("Up-for-grabs", "159818"));
}
Create and Delete Labels
private static void CreateLabels()
{
    SetUpDefaultLabels();

    try
    {
        var labels = _githubClient.Issue.Labels.GetAllForRepository("cake-contrib", "Cake.Ember").Result;

        foreach (var label in labels)
        {
            _githubClient.Issue.Labels.Delete("cake-contrib", "Cake.Ember", label.Name).Wait();
        }

        foreach (var label in _defaultLabels)
        {
            _githubClient.Issue.Labels.Create("cake-contrib", "Cake.Ember", label).Wait();
        }
    }
    catch (Exception)
    {
        Debug.Write("boom");
    }
}
So what are you doing here?
Essentially what this boils down to is...
- Create a GitHub Client, which gives you access to the GitHub API
- Configure the default labels that I want to create
- Loop through and delete all the existing labels
- Loop through and create the new default labels
With this in place, the total execution takes around 3 seconds to complete, as opposed to minutes of clicking the mouse.
Much better!
comments powered by Disqus