History of this blog
This blog has now been through a number of iterations. It started out as a custom built blog application in ASP.NET, then it moved to BlogEngine.net for a very short period. It then made an appearance as a WordPress Blog, and now, in it's current incarnation, it is using Octopress hosted on GitHub Pages. This way of hosting my blog was very much inspired by the work of Hadi and Jake in setting up their blogs, so thanks go to them for their help! Hadi pointed me in the right direction in terms of migrating initially from Wordpress, and Jake showed how it was possible to deploy automagically to GitHub Pages.
The slightly different technique that I have used, and the reason for this post, is that I have used AppVeyor to do the deployment of the generated static HTML to GitHub. What follows are the steps to make this happen.
I love TeamCity, but...
In Jake's blog post, he shows how you can use TeamCity to listen for changes in the source branch of your Octopress Git Repository, generate the static html, and then push to the master branch of the same repository. This is incredibly simple to do with TeamCity, but it obviously needs an available instance of TeamCity. Unfortunately, this is not something that I have access to for personal (i.e. outside of work) projects. As a result, I had to look elsewhere for a solution. And for me, the solution was AppVeyor.
After a small hiccup with setting up AppVeyor (which, by the way was resolved VERY quickly!), configuring AppVeyor to generate and deploy an Octopress site is very simple!
Setting up continuous deployment from AppVeyor
If you don't already have one, create an account with AppVeyor (which is completely free, assuming your repository is public), and authenticate with either GitHub, BitBucket, Visual Studio Online, or Kiln, depending on where your blog source code is going to be hosted. Since I am using GitHub Pages, I will be referring to that for the rest of this post.
Click New Project

Select your blog source code repository, in my case gep13.github.io, and AppVeyor will set about provisioning a new Project, ready to accept build steps and configuration
At this point, you could start using the AppVeyor User Interface to setup the build, and this is what I started with. However, I quickly realised that I would need to start using the appveyor.yml file. This was due to the fact that I wanted to be able to pass in a secure variables to the build process, namely my GitHub password, and this is not possible through the User Interface.
In the same way that Jake did, I have setup my GitHub repository to use the source branch as the default. This can be done through the settings page of your repository in GitHub

Create an appveyor.yml file in the root of the source branch of your repository. You can see mine here.
There are four important things in this file. Firstly, the init section. In order to push changes back to GitHub, you need to let the newly created Virtual Machine that AppVeyor is running for you know the git credentials that you want to use. This can be done using the standard
git config --globalcommand.
init:
- git config --global user.email "<Your Email Address>"
- git config --global user.name "<Your User Name>"
- The next important section is environment. This is where you can specify 1 or more vaiables that you want to have available during your build steps. If required, you can use the encrypt data tool within AppVeyor to encrypt sensitive information. This is exactly what I did with my GitHub password.
environment:
GithubUsername: gep13
GithubPassword:
  secure: XSuLygmr83zEpWcXIXMXGocN0QbooLud1eIMA3mQWKkT9LAU4TyrijLBcJIo7bD7
- Next up, we need to specify the actual operations that we want to perform. These have been lifted exactly out of Jakes configuration. The especically important thing to notice here is the
%GithubUsername%and%GithubPassword%variables. They refer to the environment variables that were configured above. NOTE: As I found out, thegen_deployrake task does both a generate and a deploy.
build_script:
  - cmd: bundle install
  - cmd: if not exist _deploy (git clone https://%GithubUsername%:%GithubPassword%@github.com/%GithubUsername%/%GithubUsername%.github.io.git _deploy)
  - cmd: cd _deploy
  - cmd: git checkout master
  - cmd: cd ..
  - cmd: rake gen_deploy
- The final things that I needed to do was to specify that I didn't want to run any tests after the main build steps were completed. This can be done using:
test: off
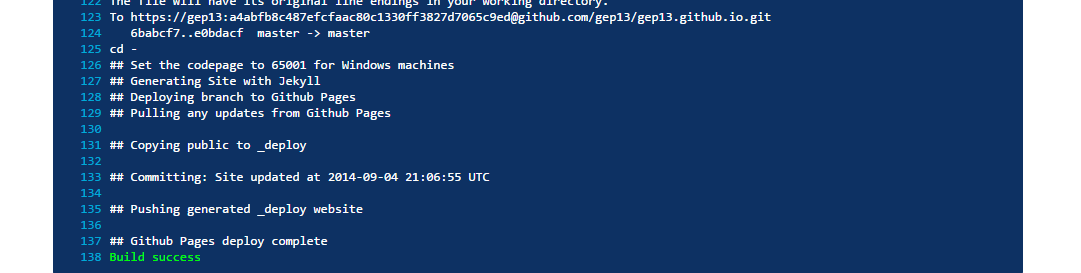
With the above file checked into your repository, AppVeyor will set about doing the build. The output of which should hopefully look something like this (the full output can be seen here)
And that, as they say, is that!
Now, everytime you make a change in the source branch of your Octopress Repository, AppVeyor will collect all the changes, execute the build steps, and deploy your latest changes to the master branch, ready for viewing on your site.