For the last few weeks I have been trying to sort of my installation of the Office 365 Beta. I am not a business, but the Beta is open to individuals as well as corporate people. There are several reasons that I wanted to play with it:
- Sheer curiosity. I heard a lot about it while I was at the BPCUK conference
- Wanted to try out the full integration experience with Windows Phone 7
- Try out some sandboxed SharePoint solutions
- Set up a meeting place for the administrators of the Aberdeen Developers .Net User Group
When you get your invite to the Beta you will be asked to hand over a domain to Office 365 to take over the administration of. The majority of the time, that shouldn’t really be a problem as the domain that you are likely to want to host on Office 365 will be a dedicated one for that purpose, however, if like me you use the domain for other stuff, or you administer your own DNS settings, you won’t want to hand over the domain to their control.
Although not mentioned when you first log into the Office 365 setup page, you are able to configure the DNS settings yourself, the end result is that the domain entries simply point to Office 365, rather than being under their direct control.
Now, before we go too much further, let me state that I actually know very little about setting up DNS entries, and it was only through the help of @ianmoran that I was actually able to get mine working.
NOTE: Ian has a post here that I used as an aid to get up and running
Required DNS Records
In order to know the DNS settings that you need to configure you have to log into the administration section of Office 365. Once in there, click on Admin. From there, click on Domains in the left hand menu, then click on the domain that you want to administer. Once there, click on DNS Manager, and you will see something like the following:
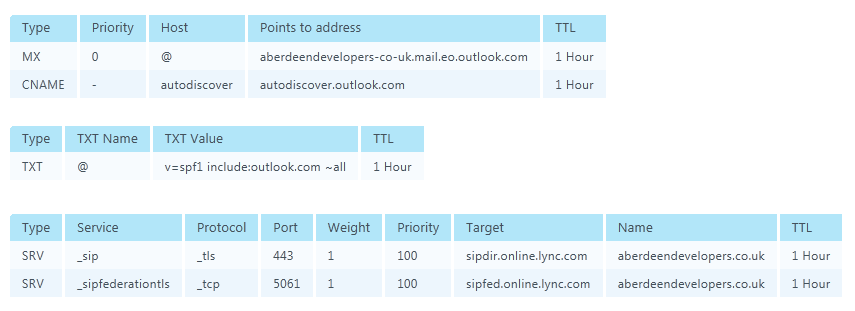
These are all the records that you will need to configure on your domain. The first set are used for the Exchange Email and the second set are used of setting up Lync 2010.
If like me, you will be able to set up the majority of these records without too much trouble. It is just a case of logging into your hosting provider and adding the records. I did this without any problems through Blacknight’s control panel for the MX, CNAME and TXT records.
However, when it came to the SRV records, I was stumped. I had never heard of SRV (Service Record) before, and through the Blacknight control panel it appeared that I was only able to create the _tcp protocol record, there was no option to create a _tls protocol record. A quick email to the support team confirmed this, but I was told that they would be able to create the record on my behalf, phew!
With all the records created, I set about testing it. The Exchange email started working straight away, both through Outlook on the desktop, Webmail on the Internet, and through Outlook on my Windows Phone 7. Success!!
However, when it came to Lync 2010, I just couldn’t get it to work!
Manual Lync 2010 Configuration
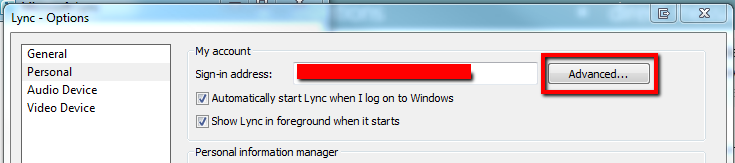
With the help of Ian, I was able to set up Lync 2010 manually, to prove that it worked at all. This was done by going into Lync and selecting Tools | Options, and from there click “Advanced...”
Then, in the Advanced Connection Settings dialogue, manually configure the internal and external server names to be sipdir.online.lync.com:443:
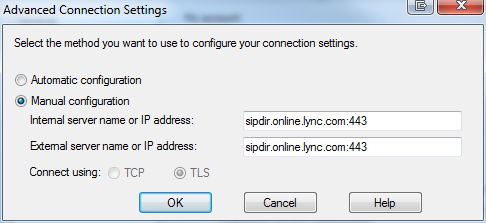
And this will allow you to log into Lync using your user that you set up in Office 365.
Testing SRV Records
Although manually settings the records was “fine” I wanted to figure out what was wrong with my set up. In order to do that, I had to figure out what the records were set up as. The feedback that I was getting from Blacknight was that everything was fine on their end, but I had no way of verifying that. I had a report that they were using dig to confirm the records, however, I don’t have a linux server to use that command, and even though I installed the Windows version of dig, I just couldn’t get it to work.
I fell back on trying to use nslookup to get the information that I needed, and I was finally able to figure out how to do this.
- Start | run
- Type cmd then press enter
- Type nslookup and then press enter
- Type set type=srv and then press enter
- Type _sip._tls.
and press enter - You will then get the record back
- Type _sipfederationtls._tcp.
and press enter - You will then get your record back
The output should look something like this:
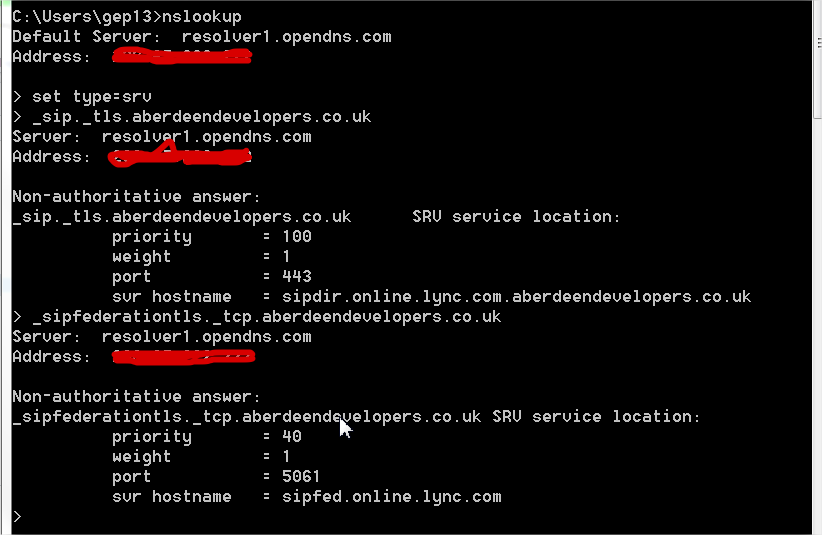
NOTE: There records are the ones that are misconfigured
Now, when I looked at this, I thought everything looked ok, when compared to the above screen shot for the DNS Manager settings within Office 365. However, when I showed this to Ian, who must have a keener eye than me, he told me that the _tls entry was incorrect. Notice how the svr hostname is appended with .aberdeendevelopers.co.uk? That is incorrect. Turns out that the SRV record which had been entered by Blacknight was missing a trailing period, which meant that the domain name was getting appended. I didn’t realise setting up DNS entries was this complicated!!
Another quick email to Blacknight support cleared up this problem, and I was then able to connect to Lync 2010, win!
comments powered by Disqus